SRX CoS configuration example

QOS

> configure

# edit interfaces ge-0/0/0

# set unit 0 family inet filter input MapCoS
# set per-unit-scheduler

# top

# set policy-options prefix-list VlanA20Percent 10.0.0.0/24
# set policy-options prefix-list VlanB80Percent 10.0.1.0/24
# set policy-options prefix-list VlanB80Percent 10.0.2.0/24
# set policy-options prefix-list MNG 2.2.2.2/32

# edit class-of-service

# set classifiers dscp Classifie_VLAN import default

# set forwarding-classes queue 5 VlanA20Percent
# set forwarding-classes queue 1 VlanB80Percent

# set interfaces ge-0/0/0 unit 0 scheduler-map VLAN_Map
# set interfaces ge-0/0/0 unit 0 classifiers dscp Classifie_VLAN
# set interfaces ge-0/0/1 unit 0 scheduler-map VLAN_Map
# set interfaces ge-0/0/1 unit 0 classifiers dscp Classifie_VLAN

# set scheduler-maps VLAN_Map forwarding-class VlanA20Percent scheduler VlanA20Percent
# set scheduler-maps VLAN_Map forwarding-class VlanB80Percent scheduler VlanB80Percent

# set schedulers VlanA20Percent transmit-rate percent 20
# set schedulers VlanA20Percent shaping-rate percent 20
# set schedulers VlanA20Percent buffer-size percent 20
# set schedulers VlanA20Percent priority high

# set schedulers VlanB80Percent transmit-rate percent 80
# set schedulers VlanB80Percent shaping-rate percent 80
# set schedulers VlanB80Percent buffer-size percent 80
# set schedulers VlanB80Percent priority low

# edit firewall filter MapCoS

# set term VlanA80Percent from prefix-list VlanA80Percent
# set term VlanA80Percent then forwarding-class VlanA80Percent
# set term VlanA80Percent then accept

# set term VlanB20Percent from prefix-list VlanB20Percent
# set term VlanB20Percent then forwarding-class VlanB20Percent
# set term VlanB20Percent then accept

# set term AllowMNG from source-prefix-list MNG
# set term AllowMNG then accept

# commit

Good Luck 🙂

By: Abed AL-R. Bishara

Junos NAT Examples

Download this PDF file

images

or right click and save target as

Content

Source NAT
Configuring address pools for Source NAT
Configuring source NAT using interface IP
Configuring source NAT using IP pool
Configuring source NAT using multiple rules
Destination NAT
Many to many translation
One to many translation
Double NAT
Source and destination translation
Static NAT

Blocking Sites via FQDN in SRX

In this example we’re emulating the configuration script with two sites “youtube & facebook”

  • First we need to configure a global DNS so that the SRX is going to resolve addresses through it:

set system name-server 1.1.1.1
set system name-server 2.2.2.2

  • Configure address-book in the untrust zone by DNS-name:

set security zones security-zone Untrust address-book address facebook dns-name facebook.com
set security zones security-zone Untrust address-book address youtube dns-name youtube.com ipv4-only
set security zones security-zone Untrust address-book address facebook_2 dns-name http://www.facebook.com
set security zones security-zone Untrust address-book address youtube_2 dns-name http://www.youtube.com

  • Assigning the address-book to an address-set:

set security zones security-zone Untrust address-book address-set deny-websites address facebook
set security zones security-zone Untrust address-book address-set deny-websites address youtube
set security zones security-zone Untrust address-book address-set deny-websites address facebook_2
set security zones security-zone Untrust address-book address-set deny-websites address youtube_2

  • Policy from trust to untrust zone:

set security policies from-zone Trust to-zone Untrust policy block-facebook match source-address any
set security policies from-zone Trust to-zone Untrust policy block-facebook match destination-address deny-websites
set security policies from-zone Trust to-zone Untrust policy block-facebook match application any
set security policies from-zone Trust to-zone Untrust policy block-facebook then deny

** Please note: If you have an implicit permit policy , insert the FQDN blocking policy before it :

insert security policies from-zone Trust to-zone Untrust policy deny-websites before policy permitall

  • And of course don’t forget the commit:

commit

Verifing:

show security policies policy-name block-facebook detail
Policy: block-facebook, action-type: permit, State: enabled, Index: 11, Scope Policy: 0
Policy Type: Configured
Sequence number: 1
From zone: Trust, To zone: Untrust
Source addresses:
any-ipv4(global): 0.0.0.0/0
any-ipv6(global): ::/0
Destination addresses:
youtube_2: 212.179.154.242/32
youtube_2: 212.179.154.237/32
youtube_2: 212.179.154.217/32
youtube_2: 212.179.154.251/32
youtube_2: 212.179.154.212/32
youtube_2: 212.179.154.236/32
youtube_2: 212.179.154.246/32
youtube_2: 212.179.154.216/32
youtube_2: 212.179.154.241/32
youtube_2: 212.179.154.247/32
youtube_2: 212.179.154.221/32
youtube_2: 212.179.154.227/32
youtube_2: 212.179.154.226/32
youtube_2: 212.179.154.231/32
youtube_2: 212.179.154.232/32
youtube_2: 212.179.154.222/32
facebook_2: 31.13.93.209/32
facebook: 173.252.120.6/32
Application: any
IP protocol: 0, ALG: 0, Inactivity timeout: 0
Source port range: [0-0]
Destination port range: [0-0]
Per policy TCP Options: SYN check: No, SEQ check: No

Good Luck 🙂

Shared by : Abed AL-R. Bishara

Junos Policer (bandwidth-limit)

First we’ve to configure bandwidth-limit 

set firewall policer VLANtrust_output if-exceeding bandwidth-limit 50m

set firewall policer VLANtrust_output if-exceeding burst-size-limit 1m

set firewall policer VLANtrust_output then discard

set firewall policer VLANtrust_input if-exceeding bandwidth-limit 10m

set firewall policer VLANtrust_input if-exceeding burst-size-limit 1m

set firewall policer VLANtrust_input then discard

Now we need to configure the filter:

**Upload configuration**

set firewall family inet filter VLANtrust_input term 0 from source-address 192.168.1.0/24

set firewall family inet filter VLANtrust_input term 0 then policer VLANtrust_input

set firewall family inet filter VLANtrust_input term 0 then accept

**download configuration**

set firewall family inet filter VLANtrust_input term 1 from source-address 0.0.0.0/0

set firewall family inet filter VLANtrust_input term 1 then policer VLANtrust_output

set firewall family inet filter VLANtrust_input term 1 then accept

Assigning the filter to interface:

set interfaces vlan unit 1 family inet filter input VLANtrust_input

set interfaces vlan unit 1 family inet filter output VLANtrust_input

Note: If you want caculate burst limit, and you don’t want to work with exact (M-megabyte) , you can download the rate limit caculator from this website or directly from this link.

Good Luck 🙂

By: Abed AL-R. Bishara

Advanced Monitoring and VPN Troubleshooting commands / hidden commands

For VPN debugging, which enables logging to the KMD log by default without the need to commit:

>request security ike debug-enable local <ip-address> remote <ip-address> level <level>

 and to turn off:

>request security ike debug-disable

Review logs written to /var/log/kmd:

> show log kmd

Checking the debug status:

> show security ike debug-status

For taking a tcpdump of an interface to analyze with Wireshark or similar (Hidden command):

>monitor traffic interface ge-0/0/1.0 write-file test.pcap

 Can be viewed on the SRX also (Hidden command):

>monitor traffic read-file test.pcap

To see default config settings (Hidden command):

# show groups junos-defaults

>show configuration groups junos-defaults

>show configuration groups junos-defaults applications

To see some system limits:

>show log nsd_chk_only

To see currently working Junos applications definitions (Hidden command):

>request pfe execute command “show usp app-def tcp” target fwdd
>request pfe execute command “show usp app-def udp” target fwdd

If you dont have the root login and still you want to capture output on PFE withough going to vty mode. Here is the way:

>request pfe execute target fwdd command “show usp threads”<<<<Just add pfe commands in colun” “.

To make all daemons re-read the configuration. (Hidden command):

# commit full

Another hidden command  useful when troubleshooting is:

> show chassis cluster information ?

Disabling UTM process (Hidden command):

admin@AbedFirewall# set system services utmd
^
syntax error.

admin@AbedFirewall# set system processes utmd disable

admin@AbedFirewall# show | compare
[edit system]
+ processes {
+ utmd disable;
+ }
admin@AbedFirewall# commit check
configuration check succeeds

ALG Configuration (hidden command):

run show security alg configuration

(sa instead of security-associations) (hidden command):

> show security ike sa
> show security ipsec sa

usefull in HA  (hidden command):

root@SRX# run set chassis cluster control-link-vlan ?
Possible completions:
disable Disable control VLAN tag
enable Enable control VLAN tag
reboot Reboot the system after setting the identifiers

Another good one (hidden command):

admin@AbedFirewall> start shell pfe network fwdd

BSD platform (OCTEON processor, 416MB memory, 8192KB flash)

FLOWD_OCTEON(AbedFirewall vty)#
clear clear commands
connect connect to a remote TNP endpoint
debug Debug commands
diagnostic diagnostic commands
eth eth commands
jsflib jsf lib information
pconnect connect to a remote PIP endpoint
peekbyte display memory in bytes
peeklong display memory in 32bit longs
peekword display memory in 16bit words
plugin plugin information
pty open a pty to a PIC
quit quit TTY environment
reboot reboot hardware
set set system parameters
show show system information
sleep pause for a few seconds
test test commands
undebug Undebug commands
vty open a vty to a remote TNP endpoint

FLOWD_OCTEON(AbedFirewall vty)# show threads
PID PR State Name Stack Use Time (Last/Max/Total) cpu
— — ——- ——————— ——— ———————
1 H asleep Maintenance 1144/73824 0/8/45 ms 0%
2 L running Idle 2200/73824 0/8/5518829 ms 0%
3 H asleep Timer Services 2120/73824 0/8/43707 ms 0%
5 L asleep Ukern Syslog 856/73824 0/0/0 ms 0%
6 L asleep Sheaf Background 1128/73824 0/8/8662 ms 0%
7 M asleep mac_db 856/73824 0/0/0 ms 0%
8 M asleep Docsis 2152/73824 0/8/22701 ms 0%
…….
214 L asleep Virtual Console 2168/73824 0/0/0 ms 0%

FLOWD_OCTEON(AbedFirewall vty)# show threads 214
PID PR State Name Stack Use Time (Last/Max/Total) cpu
— — ——- ——————— ——— ———————
214 L asleep Virtual Console 2168/73824 0/0/0 ms 0%

Wakeups:
Type ID Enabled Pending Context
Timer 00 No No 0x489ab068
Socket 00 Yes No 0x5027f088

Frame 00: sp = 0x502ceb10, pc = 0x08014cb0
Frame 01: sp = 0x502ceb88, pc = 0x0801b9b4
Frame 02: sp = 0x502cebc0, pc = 0x08047ee4
Frame 03: sp = 0x502cebf0, pc = 0x08046df0
Frame 04: sp = 0x502cec10, pc = 0x086df254
Frame 05: sp = 0x502cec38, pc = 0x0802b8ec
Frame 06: sp = 0x502cec60, pc = 0x000001a0

FLOWD_OCTEON(AbedFirewall vty)#

To log in to other node of SRX cluster (Hidden command):

{primary:node0}
lab@E1> request routing-engine login ?
Possible completions:
<[Enter]> Execute this command
| Pipe through a command
{primary:node0}
lab@E1> request routing-engine login node 1

— JUNOS 12.1R3.5 built 2012-08-09 07:05:23 UTC
{secondary:node1}
lab@E2>

——————————————

# set apply-flags omit

——————————————

request pfe execute target fwdd command “sh usp ipsec sa”

——————————————

show pfe interfaces

show pfe interfaces statistics

——————————————

show tnp addresses

——————————————

To login to other High-End node:

{primary:node1}
user@SRX-node1> start shell
% rlogin -Jk -T node0
â–’
— JUNOS 12.1X44-D40.2 built 2014-08-28 12:48:56 UTC
{secondary:node0}
user@SRX-node0>

And For fun 🙂

# run show version and haiku
Hostname: AbedFirewall
Model: srx210he
JUNOS Software Release [12.1X44-D45.2]

Nothing feels as good
Arms filled with wiggling children
So much hope and love

Good Luck 🙂

Shared by: Abed AL-R. Bishara

Source

Site to Site between SRX210 and SSG5

Topology

Screenshot_3

Configuration in SRX210 (12.1X44-D45.2):

# set interfaces st0 unit 0 family inet address 192.168.10.1/24
# set routing-options static route 192.168.7.0/24 next-hop st0.0
# set security zones security-zone untrust tcp-rst
# set security zones security-zone untrust host-inbound-traffic system-services all
# set security zones security-zone untrust interfaces pp0.0
# set security zones security-zone untrust interfaces st0.0
# set security zones security-zone Lan tcp-rst
# set security zones security-zone Lan host-inbound-traffic system-services all
# set security zones security-zone Lan interfaces fe-0/0/4.0
# set security ike proposal P1proposal authentication-method pre-shared-keys
# set security ike proposal P1proposal dh-group group2
# set security ike proposal P1proposal encryption-algorithm des-cbc
# set security ike proposal P1proposal lifetime-seconds 86400
# set security ike policy P1policy mode main
# set security ike policy P1policy proposals P1proposal
# set security ike policy P1policy pre-shared-key ascii-text Pinoci0
# set security ike gateway P1gateway ike-policy P1policy
# set security ike gateway P1gateway address 81.218.170.25
# set security ike gateway P1gateway dead-peer-detection interval 10
# set security ike gateway P1gateway dead-peer-detection threshold 3
# set security ike gateway P1gateway external-interface pp0
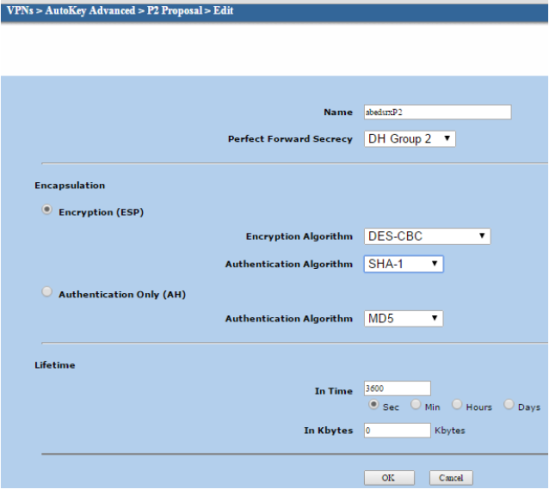
# set security ipsec proposal P2proposal protocol esp
# set security ipsec proposal P2proposal authentication-algorithm hmac-sha1-96
# set security ipsec proposal P2proposal encryption-algorithm des-cbc
# set security ipsec proposal P2proposal lifetime-seconds 36000
# set security ipsec policy P2policy perfect-forward-secrecy keys group2
# set security ipsec policy P2policy proposals P2proposal
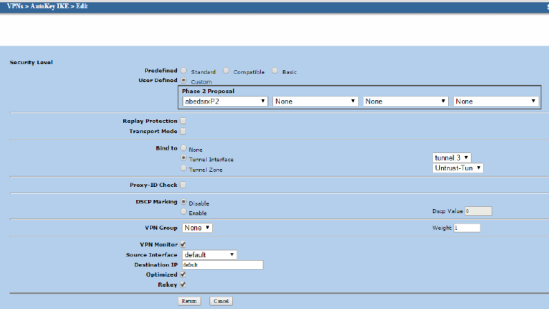
# set security ipsec vpn site1-to-site2 bind-interface st0.0
# set security ipsec vpn site1-to-site2 ike gateway P1gateway
# set security ipsec vpn site1-to-site2 ike ipsec-policy P2policy
# set security ipsec vpn site1-to-site2 establish-tunnels immediately

Now we’ve to configure a policy from untrust to trust and רeverse. In this case I’ve enabled all the ports, of course it’s under your control.

set security policies from-zone Lan to-zone untrust policy Lan2Untrust match source-address any
set security policies from-zone Lan to-zone untrust policy Lan2Untrust match destination-address any
set security policies from-zone Lan to-zone untrust policy Lan2Untrust match application any
set security policies from-zone Lan to-zone untrust policy Lan2Untrust then permit

set security policies from-zone untrust to-zone Lan policy allowall match source-address any
set security policies from-zone untrust to-zone Lan policy allowall match destination-address any
set security policies from-zone untrust to-zone Lan policy allowall match application any
set security policies from-zone untrust to-zone Lan policy allowall then permit

Configuration in SSG5 (6.3.0r19.0)

Screenshot_10 Screenshot_11 Screenshot_12 Screenshot_13 Screenshot_14 Screenshot_15 Screenshot_16 Screenshot_17

Verifying

Screenshot_10Screenshot_11

If you want to see the (U) letter and not (-) , you can enable the vpn monitor feature by this command :

Screenshot_4 Screenshot_5Screenshot_6Screenshot_7

Good Luck 🙂

By: Abed AL-R. Bishara

Basic Dynamic-VPN troubleshooting commands

1- Setup the traceoptions

# set security ike traceoptions file ike-debug

# set security ike traceoptions flag all

# set security ipsec traceoptions flag all

# commit

# run clear log ike-debug

2- Now try to connect and run this show command 

# run show log ike-debug | match ike

————————————————————————–

Clearing the Token Info

1- run the shell, and execute this command :

admin@Abed> start shell

% rm -rf /var/db/dynamic-vpn-ipsec/tokens-info

% cli

2- Now, restart the web-management

admin@Abed> restart web-management

Web management gatekeeper process started, pid 8500

————————————————————————–

# set system processes general-authentication-service traceoptions flag all

#commit

> show log authd

————————————————————————–

restart ipsec-key-management

————————————————————————–

clear security dynamic-vpn ? << all/user >>

————————————————————————–

I recomment those three websites !

http://chimera.labs.oreilly.com/books/1234000001633/ch10.html

http://rtoodtoo.net/jncie-sec-traceoptions-ipsec-troubleshooting/

http://itzecurity.blogspot.co.il/2013/08/vpn-configuration-and-troubleshooting.html

Good Luck 🙂

By: Abed AL-R. Bishara

Basic Dynamic-VPN show commands

show security dynamic-vpn users

User: abedtest , Number of connections: 1
Remote IP: 82.80.107.8
IPSEC VPN: wizard_dyn_vpn
IKE gateway: gw_wizard_dyn_vpn
IKE ID : abedtestmokedbs
IKE Lifetime: 28800
IPSEC Lifetime: 3600
Status: CONNECTED

show security ike security-associations

Index State Initiator cookie Responder cookie Mode Remote Address
2047088 UP 1933a02951bcf3c2 73322924735b6b39 Aggressive 82.80.107.8

show security ipsec security-associations

Total active tunnels: 1
ID Algorithm SPI Life:sec/kb Mon lsys Port Gateway
<268173316 ESP:3des/sha1 1c4c3cbd 3465/ 500000 – root 49424 82.80.107.8
>268173316 ESP:3des/sha1 ae69a74d 3465/ 500000 – root 49424 82.80.107.8

show security ike active-peer

Remote Address Port Peer IKE-ID XAUTH username Assigned IP
82.80.107.8 49424 abedtestmokedbs abedtest 10.99.99.4

Good Luck 🙂

By: Abed AL-R. Bishara

Dynamic-VPN configuration (SRX series)

Do not copy-paste .

In this case :

1- the WAN interface is the dialer pp0.0 .

2- you need to choose between “standard” “basic” and “compatible” in the security ike proposal-set . If you want to know the difference, please visit this website :

> configure
# set system services web-management https system-generated-certificate
# edit access address-assignment
# set pool dyn-vpn-address-pool family inet network 10.99.99.0/24
# set pool dyn-vpn-address-pool family inet xauth-attributes primary-dns 192.115.106.35/32
# set pool dyn-vpn-address-pool family inet xauth-attributes secondary-dns 62.219.186.7/32
# up
# set profile remote_access_profile client USER firewall-user password PASS
# set profile remote_access_profile address-assignment pool dyn-vpn-address-pool
# up
# edit firewall-authentication
# set web-authentication default-profile remote_access_profile
# top
# edit security ike
# set policy ike_pol_wizard_dyn_vpn mode aggressive
# set policy ike_pol_wizard_dyn_vpn proposal-set compatible/standard/basic
# set policy ike_pol_wizard_dyn_vpn pre-shared-key ascii-text presharedkey
# set gateway gw_wizard_dyn_vpn ike-policy ike_pol_wizard_dyn_vpn
# set gateway gw_wizard_dyn_vpn dynamic hostname mokedbs
# set gateway gw_wizard_dyn_vpn dynamic connections-limit number NUMBER
# set gateway gw_wizard_dyn_vpn dynamic ike-user-type group-ike-id # set gateway gw_wizard_dyn_vpn external-interface pp0.0
# set gateway gw_wizard_dyn_vpn xauth access-profile remote_access_profile
# up
# edit ipsec
# set policy ipsec_pol_wizard_dyn_vpn proposal-set compatible/standard/basic
# set vpn wizard_dyn_vpn ike gateway gw_wizard_dyn_vpn
# set vpn wizard_dyn_vpn ike ipsec-policy ipsec_pol_wizard_dyn_vpn
# top
# edit security policies from-zone Internet to-zone Internal
# set policy policy_in_wizard_dyn_vpn match source-address any
# set policy policy_in_wizard_dyn_vpn match destination-address any
# set policy policy_in_wizard_dyn_vpn match application any
# set policy policy_in_wizard_dyn_vpn then permit tunnel ipsec-vpn wizard_dyn_vpn
# top # edit security zones security-zone Internet interfaces pp0.0
# set host-inbound-traffic system-services https
# set host-inbound-traffic system-services ping
# set host-inbound-traffic system-services ike
# set host-inbound-traffic system-services ssh
# top
# edit security dynamic-vpn
# set force-upgrade
# set access-profile remote_access_profile
# set clients all remote-protected-resources 192.168.1.0/24 << Networks you want the VPN client to remote .

**please note : if there is more than one network to remote , you need to configure VPN policy for each network .

# set clients all remote-exceptions 0.0.0.0/0
# set clients all ipsec-vpn wizard_dyn_vpn
# set clients all user user
# commit and-quit

Good Luck 🙂

By : Abed AL-R. Bishara