FTP from SRX

admin@SRX> ftp 172.16.1.17

Oct 18 14:36:55

Connected to 172.16.1.17.

220-FileZilla Server 0.9.60 beta

220-written by Tim Kosse (tim.kosse@filezilla-project.org)

220 Please visit https://filezilla-project.org/

Name (172.16.1.17:admin): <type here the username if not admin>

331 Password required for cloud

Password:

230 Logged on

Remote system type is UNIX.

ftp> put /var/tmp/Flow_PCAP.ge-0.0.4 Flow_PCAP.ge-0.0.4.zip

local: /var/tmp/Flow_PCAP.ge-0.0.4 remote: Flow_PCAP.ge-0.0.4.zip

200 Port command successful

150 Opening data channel for file upload to server of “/Flow_PCAP.ge-0.0.4.zip”

100% |**********************************************************************************************************************************************************| 12403 KB    –:– ETAA

226 Successfully transferred “/Flow_PCAP.ge-0.0.4.zip”

12701026 bytes sent in 3.38 seconds (3.59 MB/s)

ftp> bye

221 Goodbye

Connection to node0 has been broken

If you need to save new configuration in cluster, and cluster is broken, like this:

admin@SRX# commit
node1:
configuration check succeeds
error:
Connection to node0 has been broken
warning: pull configuration failed, fallback to push configuration method
error: remote load-configuration failed on node0
error: remote unlock-configuration failed on node0

Then there is a hidden command you can run:

{primary:node1}[edit]
admin@SRX_Marvad_Backup# commit synchronize force
node1:
commit complete


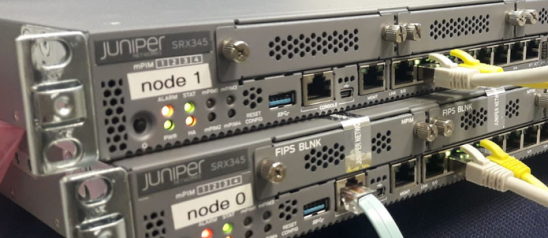
Installing SRX345 in cluster mode

2018-09-18_10h32_58

So I just finished configuring 2x SRX345 in cluster mode and here are some of the challenges that I had to face when trying to convert old configuration from old SRX platform and some tips I learned through the maintenance:

  • There is no more VLAN  nterface . If you want to configure VLAN interface then it should be irb interface .
  • The fxp0 interface has a dedicated port , and it’s named MGMT . The first port after the console .
  • The is no problem to configure cluster of SRX345 that has one power supply and one that has two power supplies. That hardware does not matter . What does matter is the platform it self , As both should be SRX345.

Configuring IPv6 on SRX firewall

1- First make sure that your SRX is support inet6 flow :

root@Lab> show security flow status
Flow forwarding mode:
Inet forwarding mode: flow based
Inet6 forwarding mode: drop
MPLS forwarding mode: drop
ISO forwarding mode: drop
Advanced services data-plane memory mode: Default
Flow trace status
Flow tracing status: off
Flow session distribution
Distribution mode: RR-based
Flow ipsec performance acceleration: off
Flow packet ordering
Ordering mode: Hardware


f it appears to be in “drop” mode , then you need to enable it and reboot the device :

root@lab# set security forwarding-options family inet6 mode flow-based
root@lab# exit
root@lab> request system reboot

After reboot:

root@School-Lab> show security flow status
Flow forwarding mode:
Inet forwarding mode: flow based
Inet6 forwarding mode: flow based
MPLS forwarding mode: drop
ISO forwarding mode: drop
Advanced services data-plane memory mode: Default
Flow trace status
Flow tracing status: off
Flow session distribution
Distribution mode: RR-based
Flow ipsec performance acceleration: off
Flow packet ordering
Ordering mode: Hardware

2- Configure IPv6 on interface :

set interfaces ge-0/0/15 unit 0 family inet6 address 2001:2222:1111:e00::d11/56

3- Static route :

set routing-options rib inet6.0 static route ::/0 next-hop 2001:2222:1111:e00::1


SRX GENCFG failed error message

Regarding to “/kernel: GENCFG: op 2 (USP Blob) failed; err 7 (Doesn’t Exist)”.

This kernel message is generated because kernel does not have a handler for a certain gencfg blob message.

It is harmless message and showing perhaps due to logging level too verbose.

You can modify your syslog level to ‘any critical’ to avoid these messages.

{primary:node1}[edit]
root@Firewall# set groups node1 system syslog file default-log-messages any ?
Possible completions:
alert Conditions that should be corrected immediately
any All levels
critical Critical conditions
emergency Panic conditions
error Error conditions
info Informational messages
none No messages
notice Conditions that should be handled specially
warning Warning messages

Junos commands you might not aware of

So there is a Junos commands you might not aware of which can make your dealing with configuring a Junos device much easy and simple ! Lets take a look at some of them !

  • ‘rename’ command:

lab@ex-1# rename ge-0/0/6 unit 1 to unit 0

while configuring a switch , accidentally you configure unit 1 to an interface and you cannot commit the configuration because there no such a unit 1 with layer 2 interfaces on EX series switches . So instead of rolling back / deleting wrong configuration , you can simply rename the configuration to the correct one .

  • ‘wildcard’ command:

[edit interfaces]

lab@ex-1# wildcard delete ge-*

matched: ge-0/0/6

matched: ge-0/0/7

matched: ge-0/0/8

delete 3 objects? [yes,no] (no) yes

if you need to delete a lot of line that having something in common , like deleting gig interfaces , you can simply use the ‘wildcard’ command

  • pipe match pipe filter command

user@switch> show interfaces terse | match “interface|0/6|0/7″

Interface Admin Link Proto Local Remote
ge-0/0/6 up down
ge-0/0/6.0 up down eth-switch
ge-0/0/7 up up
ge-0/0/7.0 up up eth-switch

showing multiple matching outputs .

  • ‘copy’ commad

[edit interfaces]

# copy ge-0/0/6 to ge-0/0/7

The copy command duplicates an interface including any child statements such as description.

  • ‘replace’ commad

# replace pattern lopbck with loopback

Make global changes to text patterns in the configuration. For example, if you consistently misspell a word common to the description statement for all of the interfaces on your device, you can fix this mistake with a single command.

  • ‘insert’ command

[edit security policies]
# insert from-zone trust to-zone untrust policy 1 before policy 2

You can use the insert (before/after) to re-order policies instead of deleting and configuring again .

  • ‘refresh’ command

admin@FW> show chassis routing-engine | match Idle | refresh 5                                                         
—(refreshed at 2017-05-03 12:12:24 IDT)—
Idle                      14 percent
Idle                      74 percent
—(refreshed at 2017-05-03 12:12:29 IDT)—
Idle                      14 percent
Idle                      74 percent
—(*more 100%)—[abort]

This command will refresh the output ecery <n> seconds .

How to view SFP info and properties in JunOS machine

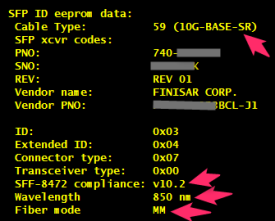
In order to find out info of SFP installed in the Junos machine without taking out the SFP module, do the following commands:

  • Log in to the shell of the relevant FPC. For this example I’ll use fpc4:

master@SW-QFX5100> start shell pfe network fpc4

  • show sfp list

(vty)# show sfp list
SFP Toolkit summary:
wakeup count: 47223201, debug: 0, periodic enabled: 1, diagnostics enabled: 1
thread: 0x03deaa78, itable: 0x03ddd868, itable iterator: 0, sem: 0x03e36fe8
polling interval delay:  1000 ms, polling max cpu:  100 ms
poll for diags every  3 wakeups , SFPs polled for diags last time:  2
last periodic CPU time:    1 ms, maximum periodic CPU time:     82 ms
SFP Toolkit syslog throttling parameters:
period: 120 samples , disable threshold:  10, enable threshold   0

diag
Index   Name             Presence     ID Eprom  PNO         SNO          calibr
—–   ————–   ———-   ——–  ———-  ———– ——-
1   Uplink SFP+ PIC(2)      Present   Complete  740-021333  AB33333         int
2   Uplink SFP+ PIC(3)      Present   Complete  740-021222  AB22222         int

I2C Acceleration table
Index   Name             Presence     ID Eprom     Reg ID    I2C Master    I2C Group
—–   ————–   ———-   ——–    ——–    ————   ——-

(vty)# show sfp 1   ?
<carriage return>     Completes command
alarms                SFP diagnostics alarms
diagnostics           display diagnostic measurements and thresholds
info                  SFP information

  • You can use only “show sfp <index of installed sfp>” and you’ll get those kind of information for example:

2017-02-21_09h49_56


commit failed error

So you’re having a ‘commit failed’ error whenever you’re issuing the commit command in your SRX device

screenshot_1

And you have trying everything you know to troubleshoot this problem, such as:

  • rebooting the device
  • issuing the ‘request system storage cleanup’ command
  • issuing the ‘commit full’ hidden command

Here I give another solution that might be helpful for you:

While connected via console:

1. show configuration | no-more | save current-config (I’d also recommend to take a local backup to your workstation as well, just in case)

2. start shell user root

3. cd /config

4. rm -f juniper.conf+

5. exit from shell

6. enter configuration mode and do a ‘load override current-config’ & commit

SRX Clustering primary\lost

Many of you came across configuring cluster in SRX firewall and got lost after they tried almost everything but they still stuck in “primary\lost” mode .

A lot of engineers are not aware of one important thing which is “cabling arrangement” . And this issue is the most of all “primary\lost” issues !!

So this table will show you where to put fxp0-1 and fab links in every node in cluster

interfaces-of-chassic-clustering

Also you can use SRX HA Configuration Generator tool. It will help you build the best HA  configuration .

You also want to consider interfaces numbering when it comes to configure fab link. Take a look at this table :

interface_numbering